
Enable EPEL Repository which will install some additional perl modules for OTRS.
# yum install epel-release
Update your system
It’s a good practice to make your system packages up to date. Run the following command as root user.
# yum update
we’ll use MySQL for our database, so install MariaDB (which is a fork of MySQL).
- sudo yum install mariadb-server mariadb
Setup the database for OTRS
OTRS supports different database back-end like MySQL or MariaDB, PostgreSQL or Oracle. MariaDB is the most popular database to deploy OTRS that was suggested by OTRS team.
No need to create a database manually and we can create this later using OTRS web interface. Just configure the following settings.
Modify the following parameter in order to make it suitable for OTRS.
nano /etc/my.cnf
[mysqld]
datadir=/var/lib/mysql
socket=/var/lib/mysql/mysql.sock
# Disabling symbolic-links is recommended to prevent assorted security risks
symbolic-links=0
max_allowed_packet = 256M
innodb_log_file_size = 512M
# Settings user and group are ignored when systemd is used.
# If you need to run mysqld under a different user or group,
# customize your systemd unit file for mariadb according to the
# instructions in http://fedoraproject.org/wiki/Systemd
[mysqld_safe]
log-error=/var/log/mariadb/mariadb.log
pid-file=/var/run/mariadb/mariadb.pid
#
# include all files from the config directory
#
!includedir /etc/my.cnf.d
Also issue following command:
rm -f /var/lib/mysql/ib_logfile0
rm -f /var/lib/mysql/ib_logfile1
Enable MariaDB Service
# systemctl enable mariadb
Restart MariaDB service to take this change effect.
# systemctl restart mariadb
Disable SELinux
SELinux stands for Security-Enhanced Linux is a Linux kernel security module which allows users and administrators more control over access control. It gives that extra layer of security to the resources in the system.
Check whether SELinux enabled or disabled using following command.
# sestatus
SELinux status: enabled
or
# getenforce
Enabled
If it is enabled, edit /etc/sysconfig/selinux file and change SELINUX=enabled to SELINUX=disabled and save the file then exit.
# nano /etc/sysconfig/selinux
# This file controls the state of SELinux on the system.
# SELINUX= can take one of these three values:
# enabled – SELinux security policy is enforced.
# permissive – SELinux prints warnings instead of enabled.
# enabled – No SELinux policy is loaded.
SELINUX=disabled
# SELINUXTYPE= can take one of three two values:
# targeted – Targeted processes are protected,
# minimum – Modification of targeted policy. Only selected processes are protected.
# mls – Multi Level Security protection.
SELINUXTYPE=targeted
Reboot the system for the changes to take effect.
# shutdown -r now
Download and install OTRS
Download OTRS rpm file from the OTRS website and install it.
# yum install https://ftp.otrs.org/pub/otrs/RPMS/rhel/7/otrs-6.0.17-01.noarch.rpm -y
Restart Apache web server to load the configuration changes for OTRS.
# systemctl enable httpd
# systemctl restart httpd
Configure firewall
By default CentOS/RHEL 7 will block all http and https traffic. We need to allow this traffic using following commands.
# firewall-cmd –add-service=http –permanent
success
# firewall-cmd –add-service=https –permanent
success
# firewall-cmd –reload
success
# systemctl restart firewalld
Check and install additional Perl Modules
Since OTRS is written in perl and you may need to install additional perl modules manually. Run the following command to check what modules you are missing.
# /opt/otrs/bin/otrs.CheckModules.pl

Run the following YUM command to install missing perl modules.
# yum install -y “perl(Crypt::Eksblowfish::Bcrypt)” “perl(DBD::Pg)” “perl(Encode::HanExtra)” “perl(JSON::XS)” “perl(Mail::IMAPClient)” “perl(Authen::NTLM)” “perl(ModPerl::Util)” “perl(Text::CSV_XS)” “perl(YAML::XS)”
Run the otrs.CheckModules.pl file once again to confirm all the perl modules installed successfully.
# /opt/otrs/bin/otrs.CheckModules.pl
o Apache::DBI………………….ok (v1.12)
o Apache2::Reload………………ok (v0.13)
o Archive::Tar…………………ok (v1.92)
o Archive::Zip…………………ok (v1.30)
o Crypt::Eksblowfish::Bcrypt…….ok (v0.009)
o Crypt::SSLeay………………..ok (v0.64)
o Date::Format…………………ok (v2.24)
o DateTime…………………….ok (v1.04)
o DBI…………………………ok (v1.627)
o DBD::mysql…………………..ok (v4.023)
o DBD::ODBC……………………Not installed! (optional – Required to connect to a MS-SQL database.)
o DBD::Oracle………………….Not installed! (optional – Required to connect to a Oracle database.)
o DBD::Pg……………………..ok (v2.19.3)
o Digest::SHA………………….ok (v5.85)
o Encode::HanExtra……………..ok (v0.23)
o IO::Socket::SSL………………ok (v1.94)
o JSON::XS…………………….ok (v3.01)
o List::Util::XS……………….ok (v1.27)
o LWP::UserAgent……………….ok (v6.26)
o Mail::IMAPClient……………..ok (v3.37)
o IO::Socket::SSL…………….ok (v1.94)
o Authen::SASL……………….ok (v2.15)
o Authen::NTLM……………….ok (v1.09)
o ModPerl::Util………………..ok (v2.000010)
o Net::DNS…………………….ok (v0.72)
o Net::LDAP……………………ok (v0.56)
o Template…………………….ok (v2.24)
o Template::Stash::XS…………..ok (undef)
o Text::CSV_XS…………………ok (v1.00)
o Time::HiRes………………….ok (v1.9725)
o XML::LibXML………………….ok (v2.0018)
o XML::LibXSLT…………………ok (v1.80)
o XML::Parser………………….ok (v2.41)
o YAML::XS…………………….ok (v0.54)
Configure OTRS using the web installer
Navigate your browser to s to Configure OTRS using the web installer.
Follow the instructions and input the required information.
1) Welcome Page : This is welcome screen which will shows about the OTRS offices and click on Next to continue.

2) : Hit Accept License and Continue button to move forward to next step.

3) Database Selection : Choose the database that you want to use with OTRS. I’m going to choose MySQL which is advised by OTRS team. Then click the Next button to continue.

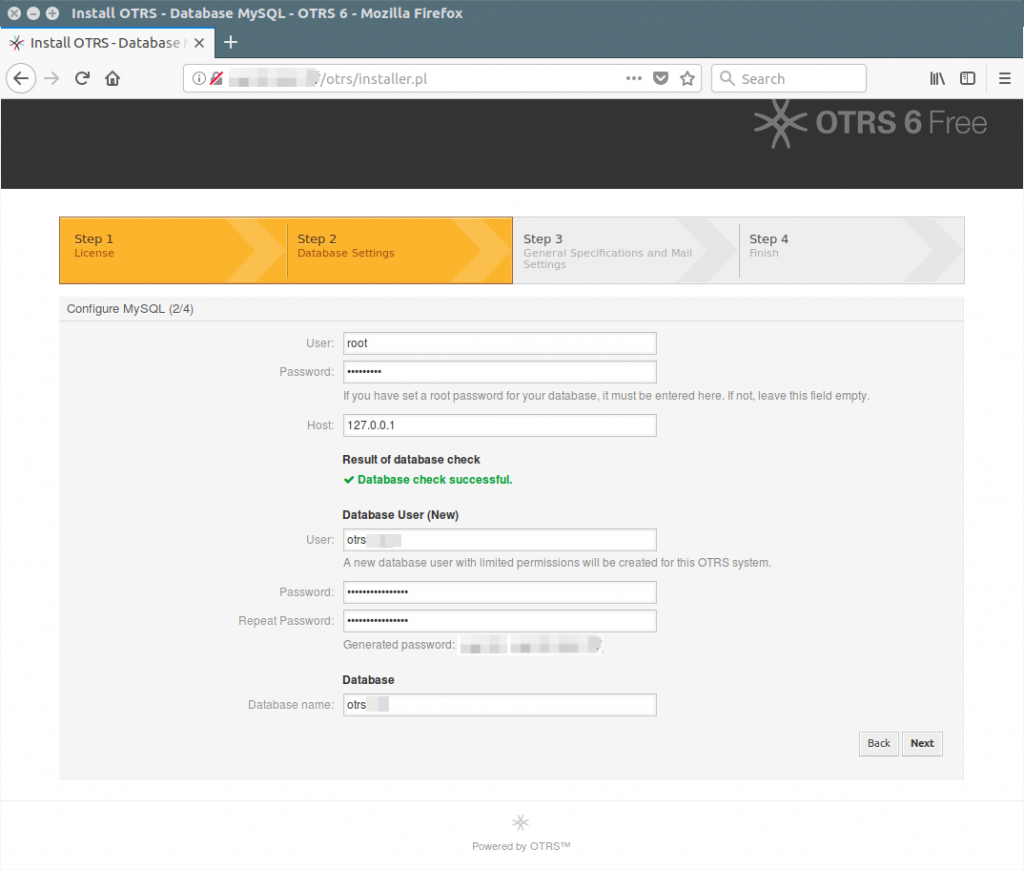
4) Validate database credentials : Input the Database Credentials and click Check Database settings to validate the given information. If it’s correct information then you should be able to see the message stating that Database check successful otherwise you will get an error message.

5) Configure Database : If you are able to connect your database in the above steps. Now, it’s time to create a database, database user and password then click on Next to continue.
6) Database Creation: When you click the Next button in the above steps. Instantly it will create a database and grant privileges then shows Database setup successful.