- Install this on Centos 7
- Disable selinux
setenforce 0 - Install wget
yum install wget -y
| 4 | echo “net.ipv6.conf.all.disable_ipv6 = 1” >> /etc/sysctl.conf |
| 5 | echo “net.ipv6.conf.default.disable_ipv6 = 1” >> /etc/sysctl.conf |
| 6 | echo 1 > /proc/sys/net/ipv6/conf/all/disable_ipv6 |
| 7 | echo 1 > /proc/sys/net/ipv6/conf/default/disable_ipv6 |
| 8 | yum -y update |
| 9 | yum -y install httpd mariadb mariadb-server php php-mysql php-fpm |
| 10 | yum -y install epel-release |
| 11 | yum -y install php-mbstring php-gd httpd-devel php-mcrypt php-mysql php-ZendFramework-Db-Adapter-Pdo-Mysql sqlite php-mcrypt php-soap |
| 12 | yum -y install rpm-build redhat-rpm-config |
| 13 | yum -y install telnet-server telnet nmap |
| 14 | yum -y install proj |
| 15 | yum -y install tinyxml |
| 16 | yum -y install mod_perl perl-Archive-Zip perl-CPAN perl-YAML |
| 17 | yum -y install perl-Digest-SHA1 php-pecl-zip php-gd php-gd perl-XML-Simple perl-Net-IP perl-SOAP-Lite httpd-devel perl-DBI perl-DBD-MySQL perl-Compress-Zlib perl-Apache-DBI |
| 18 | yum -y install –enablerepo=epel perl-XML-Entities |
| 19 | chmod 755 -R /var/www/ |
| 20 | printf “<?php\nphpinfo();\n?>” > /var/www/html/info.php; |
| 21 | systemctl start mariadb |
| 22 | systemctl start httpd |
| 23 | systemctl enable httpd |
| 24 | systemctl enable mariadb |
- Launch MySQL Secure Installation script
/usr/bin/mysql_secure_installation - Install additional package
cpan XML::Entities cpan Apache::DBI cpan ModPerl::MM cpan Apache2::SOAP cpan Mojolicious::Lite cpan Switch cpan Plack::Handler (or) yum install "perl(XML::Entities)" yum install "perl(Apache::DBI)" yum install "perl(ModPerl::MM)" yum install "perl(Apache2::SOAP)" yum install "perl(Mojolicious::Lite)" yum install "perl(Switch)" yum install "perl(Plack::Handler)" - Exclude ports 80 for Apache, 3306 for MySQL and 25 for SMTP from iptables
firewall-cmd --zone=public --add-port=80/tcp --permanent firewall-cmd --zone=public --add-port=3306/tcp --permanent firewall-cmd --zone=public --add-port=25/tcp --permanent firewall-cmd --reload - Install and activate the REMI and EPEL RPM Repositories
wget https://dl.fedoraproject.org/pub/epel/epel-release-latest-7.noarch.rpm && wget http://rpms.famillecollet.com/enterprise/remi-release-7.rpm && rpm -Uvh *.rpm - Update PHP
yum update php* --enablerepo=remi -y - Verify the new PHP version
php -v PHP 5.4.45 (cli) (built: Mar 1 2018 09:57:11) Copyright (c) 1997-2014 The PHP Group Zend Engine v2.4.0, Copyright (c) 1998-2014 Zend Technologies - Download OCS Inventory and run setup
OCS_VER=2.4.1 && cd /var/www/html && wget https://github.com/OCSInventory-NG/OCSInventory-ocsreports/releases/download/2.4.1/OCSNG_UNIX_SERVER_$OCS_VER.tar.gz && tar -xzvf OCSNG_UNIX_SERVER_$OCS_VER.tar.gz && cd OCSNG_UNIX_SERVER_$OCS_VER && ./setup.sh - Increase post_max_size and upload_max_filesize in /etc/php.ini
post_max_size = 200M upload_max_filesize = 200M - Restart Apache
service httpd restart - Add write permission to the directory
chmod +w /var/lib/ocsinventory-reports - Run mysql_upgrade
mysql_upgrade -u root -p[password] - Create OCS user in MySQL and assign privileges for OCSWEB database
mysql -u root -p [password] GRANT ALL PRIVILEGES ON `ocsweb` .* TO 'ocs'@'localhost' IDENTIFIED BY 'ocs' WITH GRANT OPTION; FLUSH PRIVILEGES; - Perform initial OCS config then login to OCS
URL: [IP Address]/ocsreports Login: admin Password: admin MySQL login: ocs MySQL password: [your password when setting up MySQL] Name of Database: ocsweb MySQL Hostname: localhost - Change ‘Trace Deleted’ config to ‘ON’ in OCS. Config > Config > Server
Installation of OCS Agent on Client
Windows
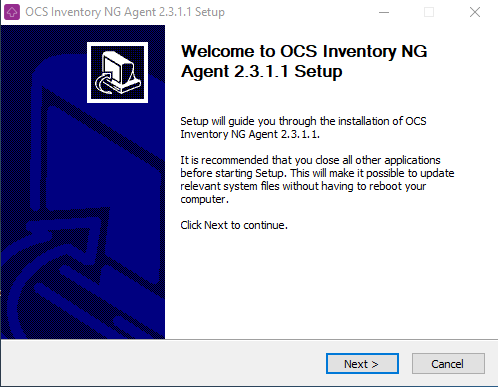
Run “OCS-NG-Windows-Agent-Setup.exe” on client computer..
..and click “Next” button
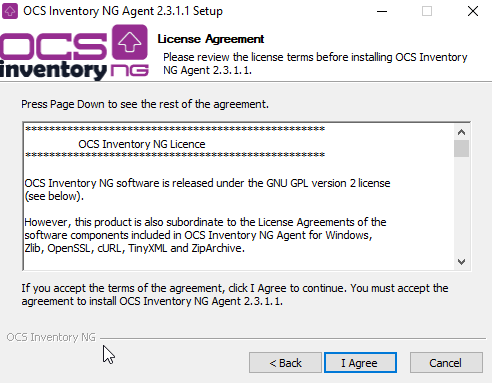
Validate license agreement by clicking “I agree” button.
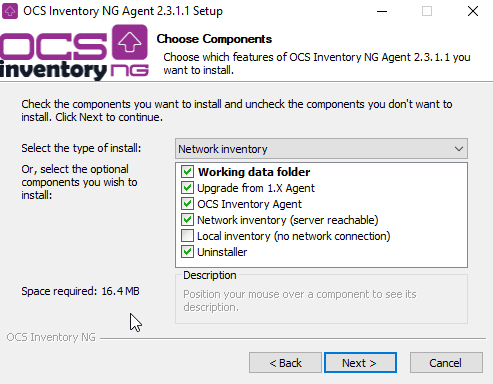
Select the installation type you want:
- Network inventory: Computer can reach OCS Inventory NG Server through the network, and so, Agent will be launched using either a Windows Service, or a Logon/GPO script.
- Local inventory: Computer is not connected to a network, or will never be able to reach OCS Inventory NG Server. You can generate an inventory of this computer and save to file to be imported later on server (see chapter Generating inventory of a non network connected Windows computer below).
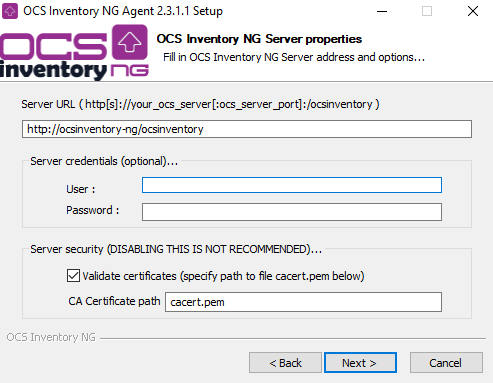
Fill in OCS Inventory NG Communication server URL
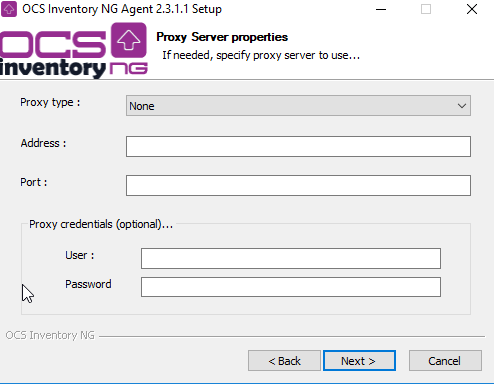
If needed, select proxy type to use to connect to Communication Server, proxy address and port, and proxy credentials if required (these credentials will be encrypted to be stored into configuration file). Agent support HTTP, SOCKS 4 and SOCKS 5 proxies.
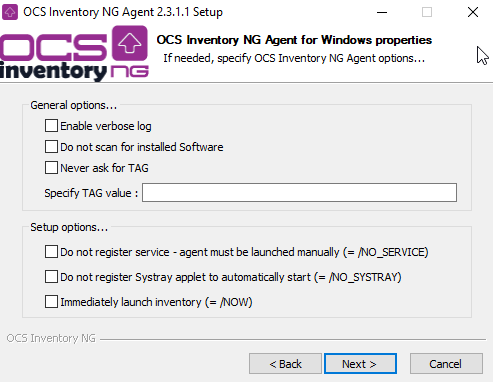
By default, OCS Inventory Agent write only few information in log files. You may increase this enabling “Verbose log”. You may also disable TAG question, or specify the TAG value. Last, indicate which level of system integration you need:
- Do not register service using LocalSystem account (i.e, use standalone agent, which must be launched manually or using login script).
- Do not configure OCS Inventory NG Systray Applet to start automatically when user log in. This applet allows user to manually run agent, or to display inventory information. Disabling this option does not create shortcut link in “All users” startup menu.
- Launch inventory just at the end of setup.
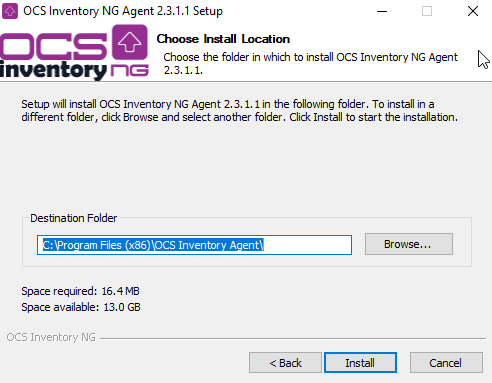
Choose destination folder, “C:\Program Files\OCS Inventory Agent” by default (“C:\Program Files (x86)\OCS Inventory Agent” under Windows 64 bits), and click “Install” button.
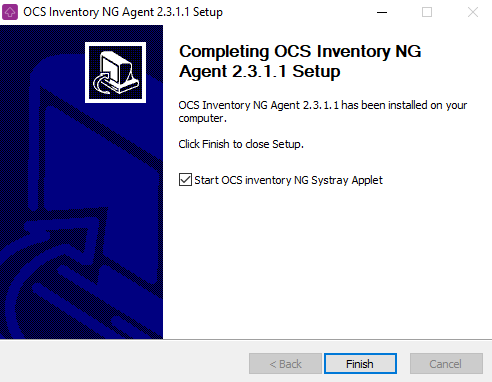
Click “Finish” button to close OCS inventory NG Agent Setup.
This is the interactive installation setup. However, this process requires that you launch it under all your computers.
Linux
OCS Inventory NG agent for Linux can only be set up locally. You cannot deploy the agent through the network currently as this is possible for Windows agent. However, you can choose during setup to activate auto-update of the agent if you’ve chosen HTTP inventory method.
On Fedora/Redhat/Centos7 like Linux, you can use “yum” tool to set required modules up like following:
$ sudo yum install perl-XML-Simple perl-devel perl-Compress-Zlib perl-Net-IP perl-LWP perl-Digest-MD5 perl-Net-SSLeay perl-Data-UUID
Optional modules: these modules are available on EPEL repository. Don’t forget to add this repository to your system or download each package individually from the repository
$ sudo yum install perl-Crypt-SSLeay perl-Net-SNMP perl-Proc-Daemon perl-Proc-PID-File perl-Sys-Syslog pciutils smartmontools monitor-edid
Installing Linux Agent with RPM
On Redhat/Centos 7 you can install the unix agent with RPM
You need to have “wget” to download the repo of EPEL and OCS
$ sudo wget https://dl.fedoraproject.org/pub/epel/epel-release-latest-7.noarch.rpm
$ sudo wget https://rpm.ocsinventory-ng.org/ocsinventory-release-latest.el7.ocs.noarch.rpm
You can install the repo with “yum”
$ sudo yum install ocsinventory-release-latest.el7.ocs.noarch.rpm epel-release-latest-7.noarch.rpm
To install the unix agent and requirement use this command:
$ sudo yum install ocsinventory-agentHere is a sample configuration file for OCS Inventory NG Linux agent.
<CONF>
    <DEVICEID>computer.domain.tld-2006-02-27-13-59-47</DEVICEID>
    <DMIVERSION>2.2</DMIVERSION>
    <IPDISCOVER_VERSION>3</IPDISCOVER_VERSION>
    <OCSFSERVER>my_ocs_com_server.domain.tld:80</OCSFSERVER>
</CONF>
You can choose between 3 methods for sending inventory:
- http: computer is connected to the network and is able to reach the Communication server with HTTP protocol USED BY DEFAULT.
- https: computer is connected to the network and is able to reach the Communication server with HTTPS protocol. You have to configure SSL on your OCS Server and copy the SSL certificate on the agent directory to use this method.
- local: computer is not connected to the network and inventory will be generated in a file manually sent to OCS Inventory NG by the operator. This option must be set manually in ocsinventory-agent.conf like this:
local=/tmp
For two others methods:
Syntax : http[s]://ocsinventory-ng-server[:port]/ocsinventory
Examples:
ocsserver.domains.local
https://w.x.y.z
ocsserver.domains.local:1234
https://ocsserver.domains.local
Mac OS
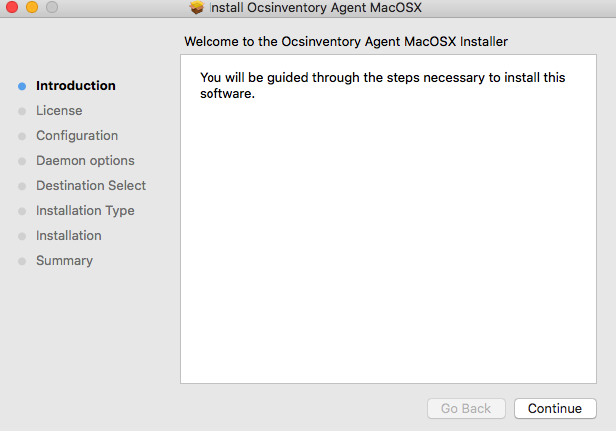
Download OCS MacOSX agent from OCS Inventory NG website download page(http://www.ocsinventory-ng.org/en/#home-en ), unzip the file and double click “Ocsinventory_Agent_MacOSX.pkg”.
Click “Continue”.
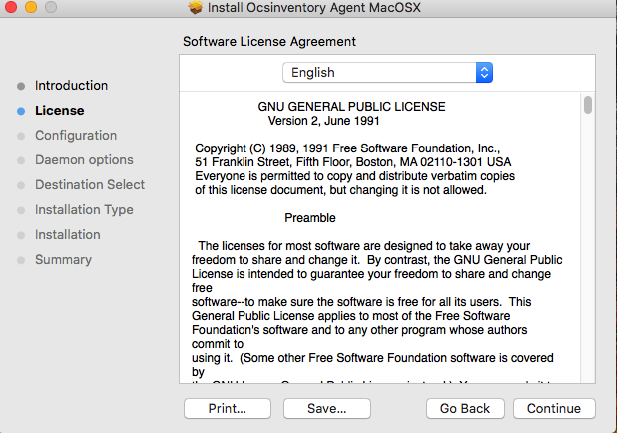
Validate license agreement by clicking “Continue” and “Agree”.
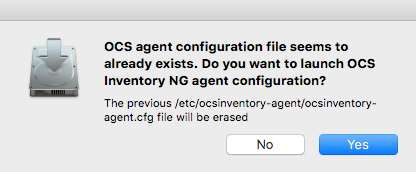
If you already made an OCS MacOSX agent installation, you may be asked if you want to launch OCS MacOSX configuration. Click on “Yes” to launch configuration panel or “No” to skip this step.
Warning: message=If you click on "Yes", /etc/ocsinventory-agent/ocsinventory-agent.cfg file content will be erased !
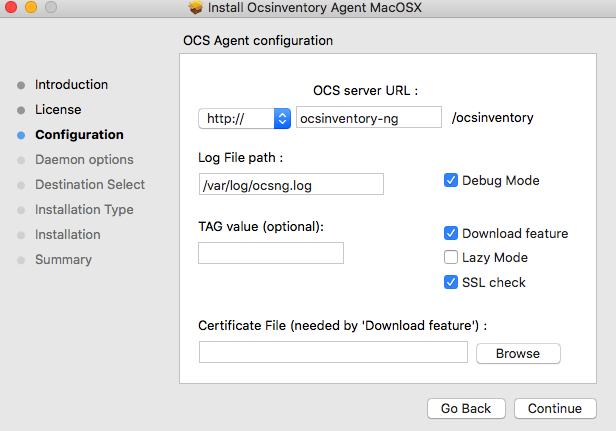
Set your OCS MacOSX agent configuration by choosing several options: Http or https for MacOSX agent communication to OCS server (“http” by default). OCS server server name (“ocsinventory-ng” by default). MacOSX agent TAG value (optional). Log file path for OCS MacOSX agent (“/var/log/ocsng.log” by default). Activate or Unactivate OCS MacOSX agent debug mode for logs (activated by default). Activate or Unactivate OCS MacOSX agent packages download feature (activated by default). Activate or Unactivate OCS MacOSX agent SSL certificate feature (activated by default). Certificate file path (mandatory if you activate OCS MacOSX agent packages download feature). Certificate file must be named as “cacert.pem”.
Click on “Continue” to validate configuration.
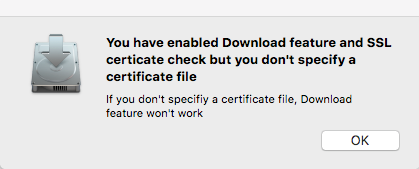
If you activate OCS MacOSX agent packages download feature and SSL feature without specifying a certificate file path, you may have this warning.
Warning: message=If you activate OCS MacOSX agent packages download feature without specifying a certificate file path, OCS MacOSX agent packages download feature won't work !!!
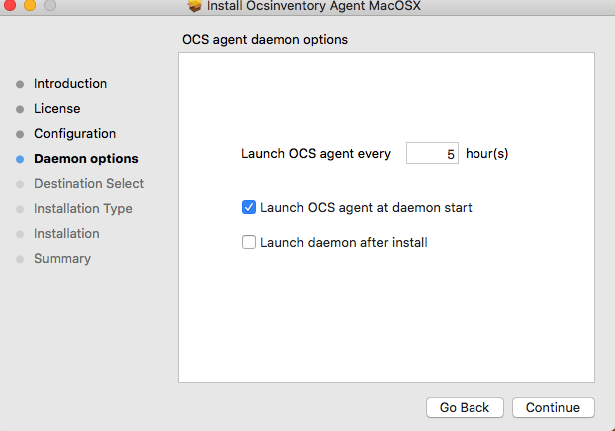
Set how OCS MacOSX agent will be launched by MacOSX Launchd daemon by choosing several options: Periodicity for OCS MacOSX agent to be launched by Launchd daemon (5 hours by default).Activate or Unactivate OCS MacOSX agent launch at Launchd daemon start (activated by default). * Activate or Unactivate OCS MacOSX agent launch, using Launchd daemon, after installation (inactivated by default)
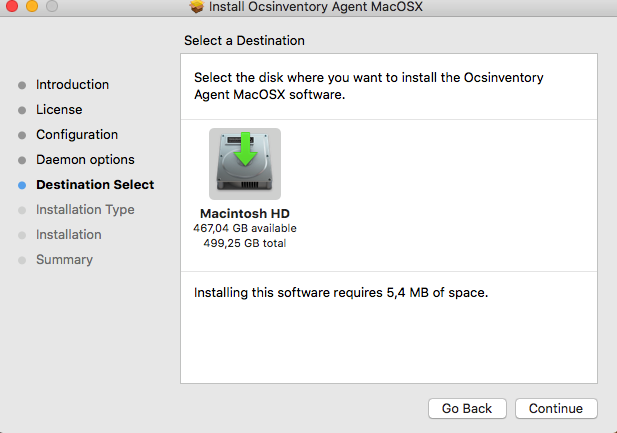
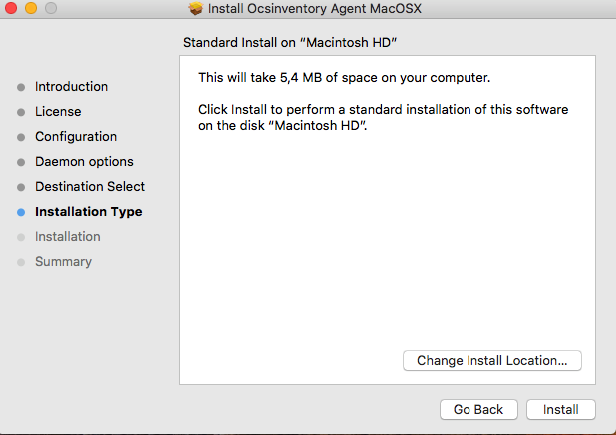
Select hard drive where you want to install OCS MacOSX agent and click “Continue”.
Click “Install”.
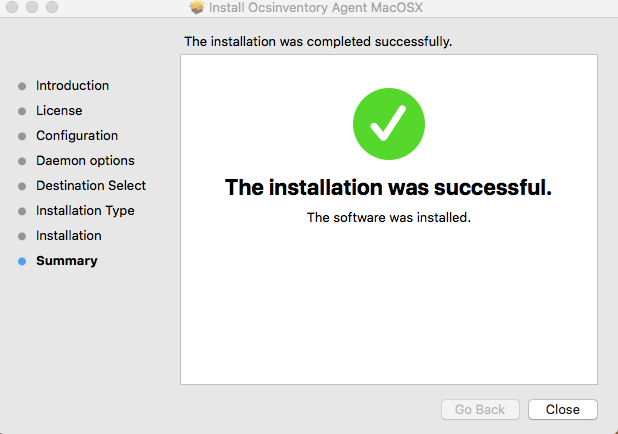
Click “Close” to end installation.
Launch MacOSX agent
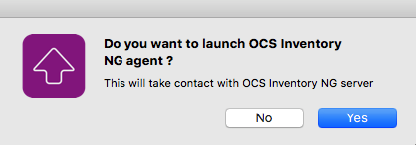
To launch MacOSX agent, open a new Finder window, go to Applications and then double click on OCSNG.app.
A new window appears and click Yes to launch agent or No to cancel.
During agent launch you will see an icon in your Dock and this will disappear when agent launch will be ended.
Android
Installation of Android Agent
2 solutions to install Android agent.
From OCS repository on Github : Download and decompress the lastestversion of Android Agent from download page of our website.
Place this file on SDCARD and launch it.
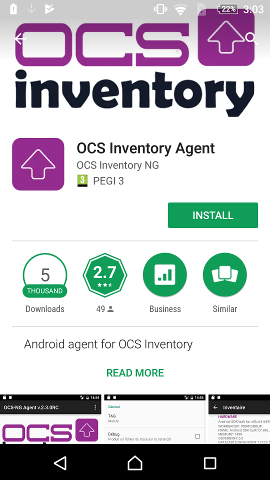
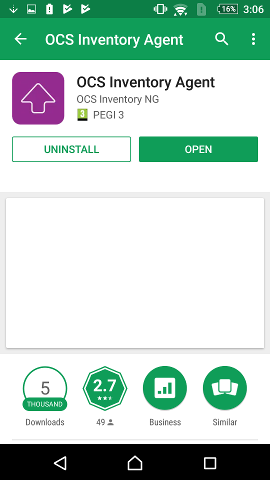
- From PlayStore : Download application and launch installation.
At the end of installation, icon is created on desktop, and a message prevents your application was installed correctly. Click on Open to quit the playstore and launch application.
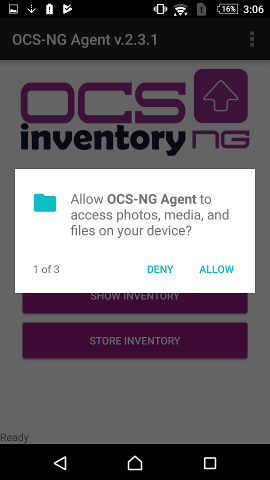
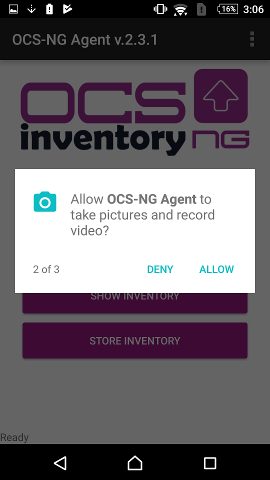
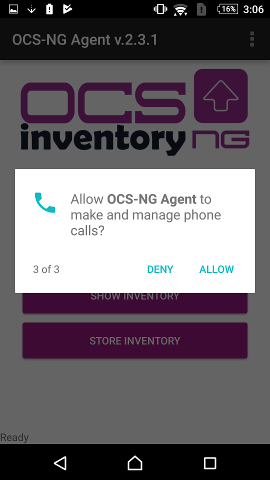
Note: On android v6.0 and more when you launch the app you can authorize the application to access to the different information and data on your device
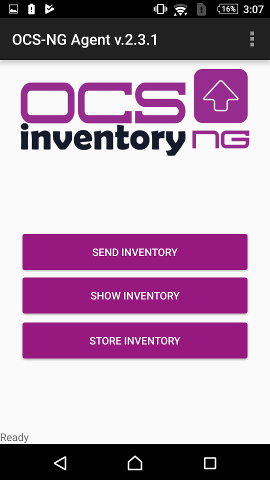
Now you see the main screen of the application, which allows you to:
- send an inventory (you will have to fix the configuration before)
- display inventory (section by section)
- store inventory on your SDCARD (/mnt/sdcard/ocs/inventory.xml)
- edit the configuration, using configuration standard menu of Android
Configuration of Agent
By clicking on configuration standard button of Android (different depending on the device), 4 menus are available:
- Configuration : Access to agent configuration
- About : About OCS Inventory NG agent installed
- Import configuration : Import a configuration file if present in directory ocs
- Export configuration : Export the configuration to backup or using on others devices

General Configuration of agent
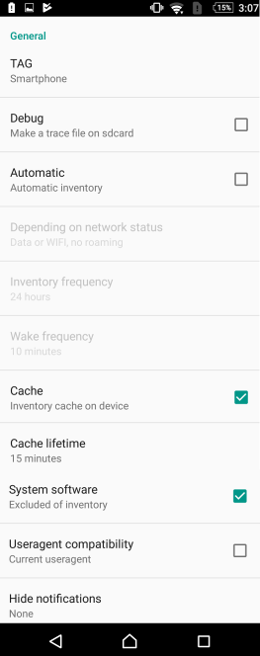
- TAG : Cathegory TAG in OCS
- DEBUG : possible to generate a trace file in the ocslog.txt agent directory
- AUTOMATIC : define if agent works as a service or a standalone application
- DEPENDING ON NETWORK STATUS : Define using mobile internet connection or Wifi
- INVENTORY FREQUENCY : define frequency between 2 inventories (in hours)
- WAKE FREQUENCY : define time between 2 verifications of time since last inventory
- CACHE : possible to recordd inventory cache on device
- CACHE LIFETIME : define cache timelife (in minutes)
- SYSTEM SOFTWARE : Exclude or include software like clock
- USERAGENT COMPATIBILITY : Active this option for old OCS Inventory Server under 2.X
- HIDE NOTIFICATION : Show off or on the notification from OCS android agent
Configuration concerning server
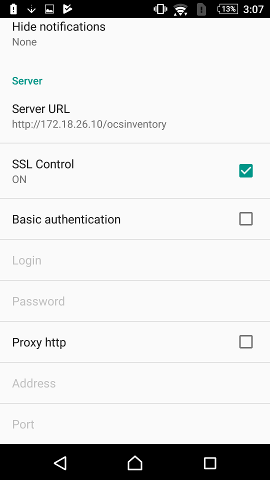
- SERVER URL : define URL address of OCS Inventory NG server